
Chances are if you’ve found yourself reading this blog post, then you’ve been searching for insights on that frustrating pain over the front of your hip. Rest assured that you’re not alone, hip pain described as sharp and/or pinching pain in the front and/or inside of the hip is nothing we haven’t heard before! While there are many things that may contribute to anterior hip pain, one of the most likely culprits is something called “femoroacetabular impingement syndrome” (FAIS). It’s a fairly technical name to describe a problem that relates to naturally occurring differences in the anatomy (or what we often call “morphology”) of the hip. In this article, we will help you understand how to manage hip impingement with physical therapy treatment and exercises!
Hip Anatomy 101
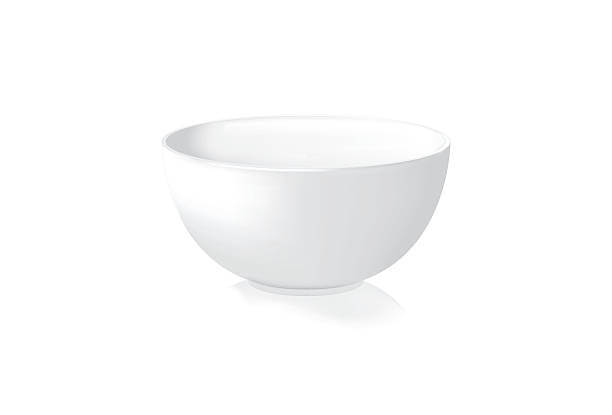
Before diving in deeper, let’s define a few different instances of what hip impingement can look like from a skeletal perspective. Briefly consider that your hip is made up of two large parts: (1) the acetabulum and (2) the femoral head and neck. Imagine your acetabulum as a large soup bowl, fairly deep in size and concavity: that’s your hip socket.
The head of your femur is a fairly spherical structure that typically fits flush into your hip socket. There is often a nice, broad contact between these two surfaces, providing for a secure and robust fit. The femoral neck connects the femoral head to the shaft of your femur and plays a large role in your hip anatomy — often influencing how you squat and move.
Manage Your Nagging Hip Impingement Pain With Prehab!

The Hip [P]Rehab Program is a physical therapist-developed, step-by-step program that teaches you how to optimize your hip health. This program will bulletproof your hips for anything life throws at you, such as hip impingement with physical therapy intervention! Learn more HERE!
Anatomical Variants of the Hip
Knowing these shapes, appreciate that there are essentially 3 different variances that may describe your cranky hip.
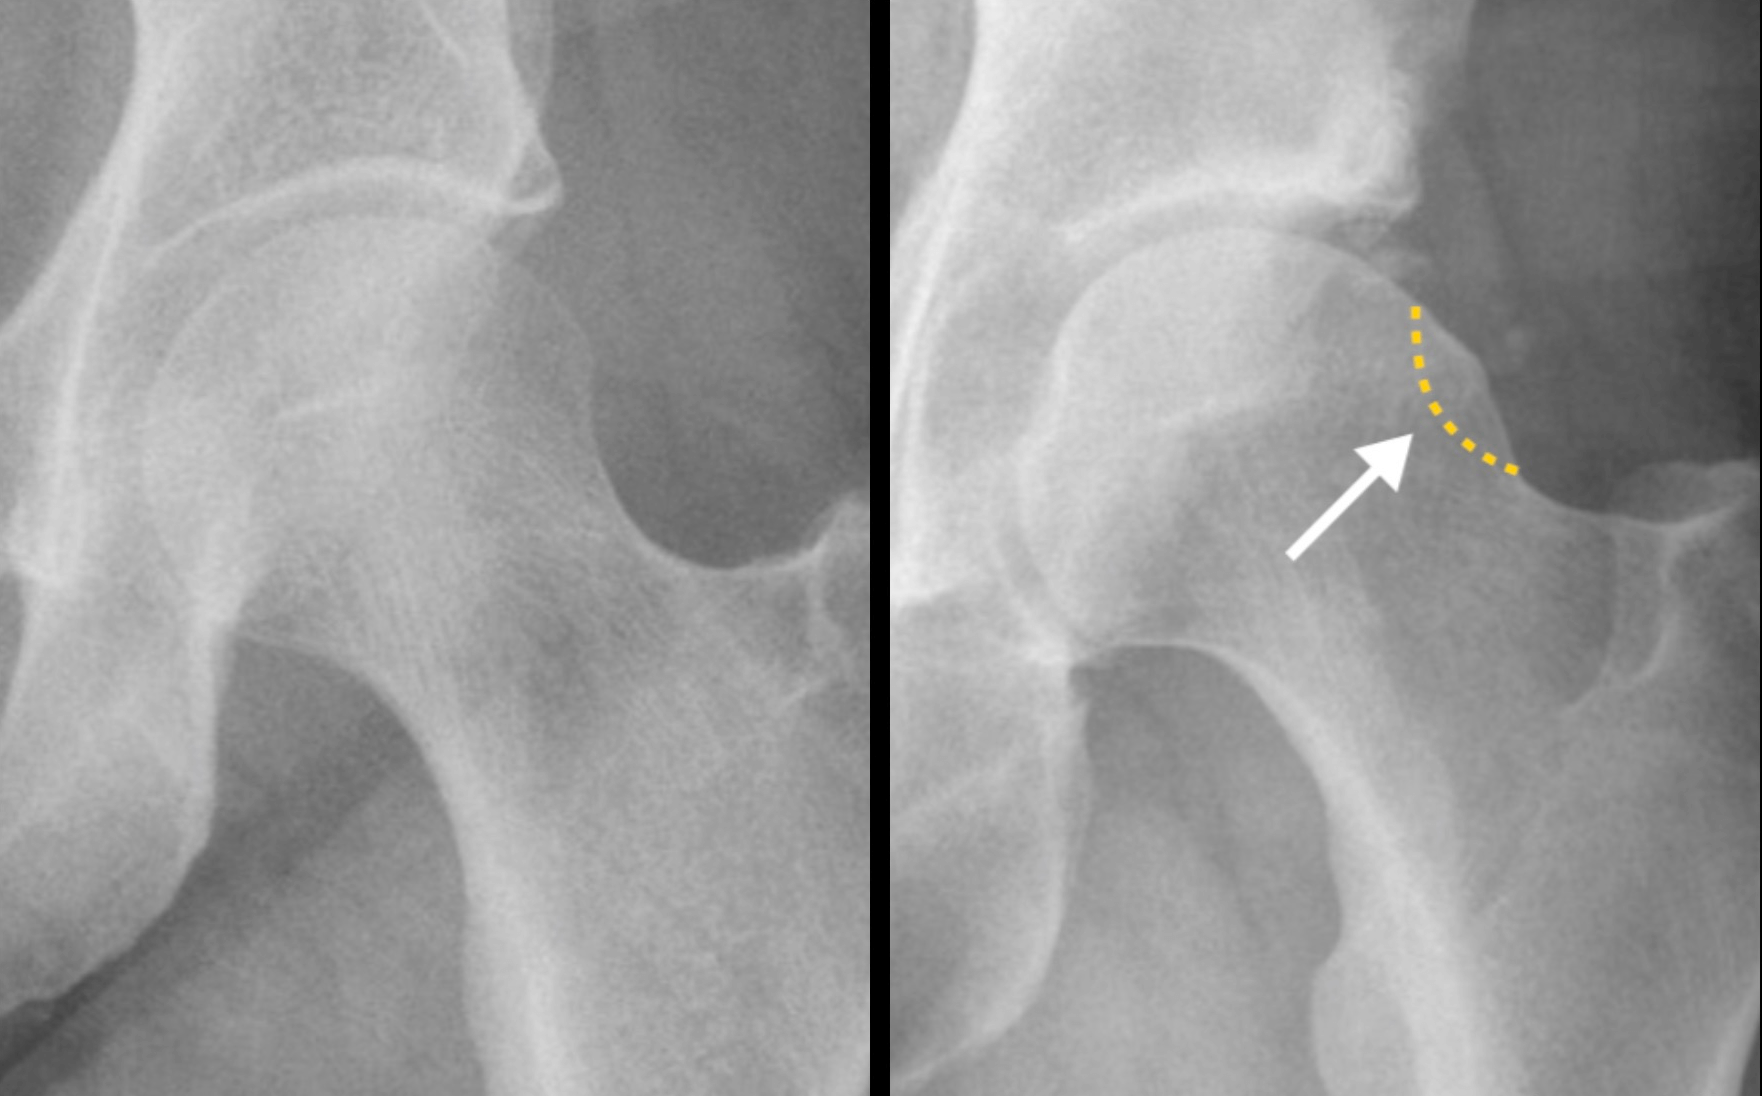
- The first variance is called a Cam Morphology. This occurs when the femoral head is shaped strangely. What should be a smooth and spherical structure instead has a strange flattening or convexity (1). This creates a scenario where the femoral head and neck junction are shaped differently than what we’d consider of a “normal” hip.
- The second variance is called a Pincer Morphology. This occurs when your soup bowl may be deeper than desired. As a result, there is either a global or focal over-coverage of the femoral head by the acetabulum (1).

- Last, the most common variance is called a Mixed Morphology, where you have some combination of the two. Appreciating this anatomy, even loosely, can provide some understanding of what may be occurring inside your hip.
FAI Exercises That Will Help Your Hip Pain
Now just because you may have one of these variances doesn’t necessarily mean you’re doomed to experience pain. In the rehabilitation world, you’ll often hear therapists say: “morphology does not equal pathology.” In other words, while your anatomy may deviate away from what a textbook may consider “normal,” this doesn’t mean corrective surgery is immediately indicated. Rather, a good clinician will take both into consideration: both your symptoms and imaging should dictate the treatment a medical provider will recommend.
In fact, in order to ‘qualify’ for a diagnosis of hip impingement, there need to be changes appreciated on imaging in conjunction with clinical hip impingement symptoms! There are plenty of people that have changes appreciated on imaging (the hip morphology changes are coincidentally observed when imaging for other reasons), but no hip impingement symptoms!
READ: EXERCISES FOR TIGHT HIPS

Various Treatment Options
This being said, there are a few different options to consider in the management of your hip. You could consider options of conservative management (physical therapy, activity modification, etc.), medical management/corrective surgery (injection, arthroscopy, etc.), or ideally a combination of the two if surgery is warranted. But which route is best?
There are several large studies that researchers have conducted to better understand which treatment options for FAIS are most effective. Two large randomized controlled trials compared patient outcomes following either physical therapy or surgery. One found that outcomes were similar when compared to one another (3).
The other found that surgery was superior to best conservative care (4). However, these researchers found that regardless if subjects chose physical therapy or corrective surgery, participants did experience significant improvements; meaning that there were meaningful improvements regardless of treatment selection. But to be clear, the surgical group in this particular study experienced a greater resolution of symptoms.
This being said, we likely can’t suggest the perfect treatment for you, as the decision-making process is fairly fluid and depends on the specifics of your situation. However, in most cases, an orthopedist will often refer for 6 to 8 weeks of physical therapy before recommending surgery. In best practice, a hip arthroscopist and physical therapist will work for hand in hand to determine what will provide you the most relief. Hip pain is fairly niche in the medical community, and having a great medical team to surround yourself with will help you through your journey. However, if you’re looking to explore some of the options that physical therapy can offer from the comforts of your home, we’re diving into that next.
LISTEN: HIP PAIN AND FAI WITH DR. KELECHI OKOROHA
Hip Impingement Treatment
When I have patients come in for formal sessions of physical therapy to help manage their FAIS, education easily takes up at least half of our time together. Albeit a fairly simple problem from a mechanical standpoint, most who have struggled with FAIS have attempted self-management using well-intended, end-range hip exercises online. Appreciate that if you’re having anterior hip pain secondary to end-range hip flexion (bringing your knee up into your chest, deep squats, etc.) that no amount of stretching or pushing further into this motion barrier is going to be of benefit. That means a large amount of those hip mobility drills you’ve seen online are likely not going to help push you in the right direction. If it’s a bone on bone problem; pushing your femoral head and neck so that it rides into the outer rim of your hip socket isn’t ever going to be the answer here.

The Prehab membership is the anti-barrier solution to keeping your body healthy. Access state-of-the-art physical therapy, fitness programs, and workouts online in the comforts of your own home or gym! Taking control of your health with exercise & education from the palm of your hand has never been easier. Get access to 50+ programs, 100+ unique workouts, and 3000+ exercises to build your own workout routines. Trial it for free, and learn how to get out of pain, avoid injury, and optimize your health with [P]rehab!
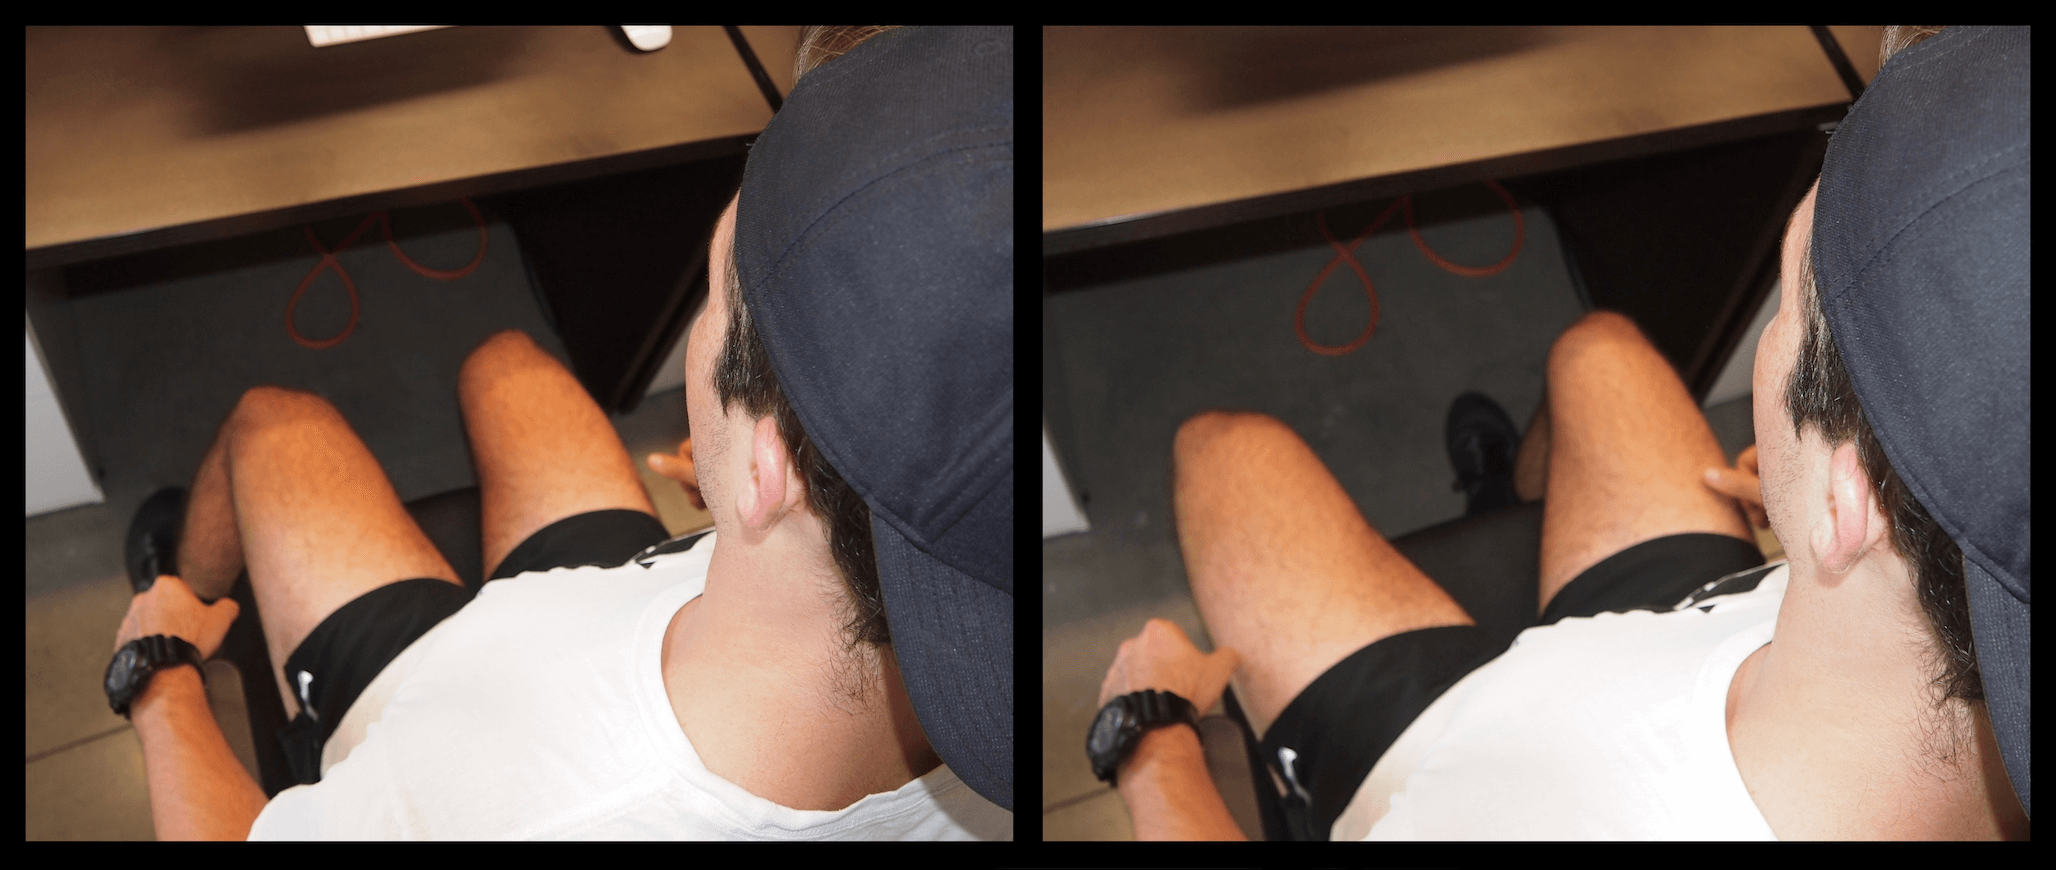
Sitting Posture
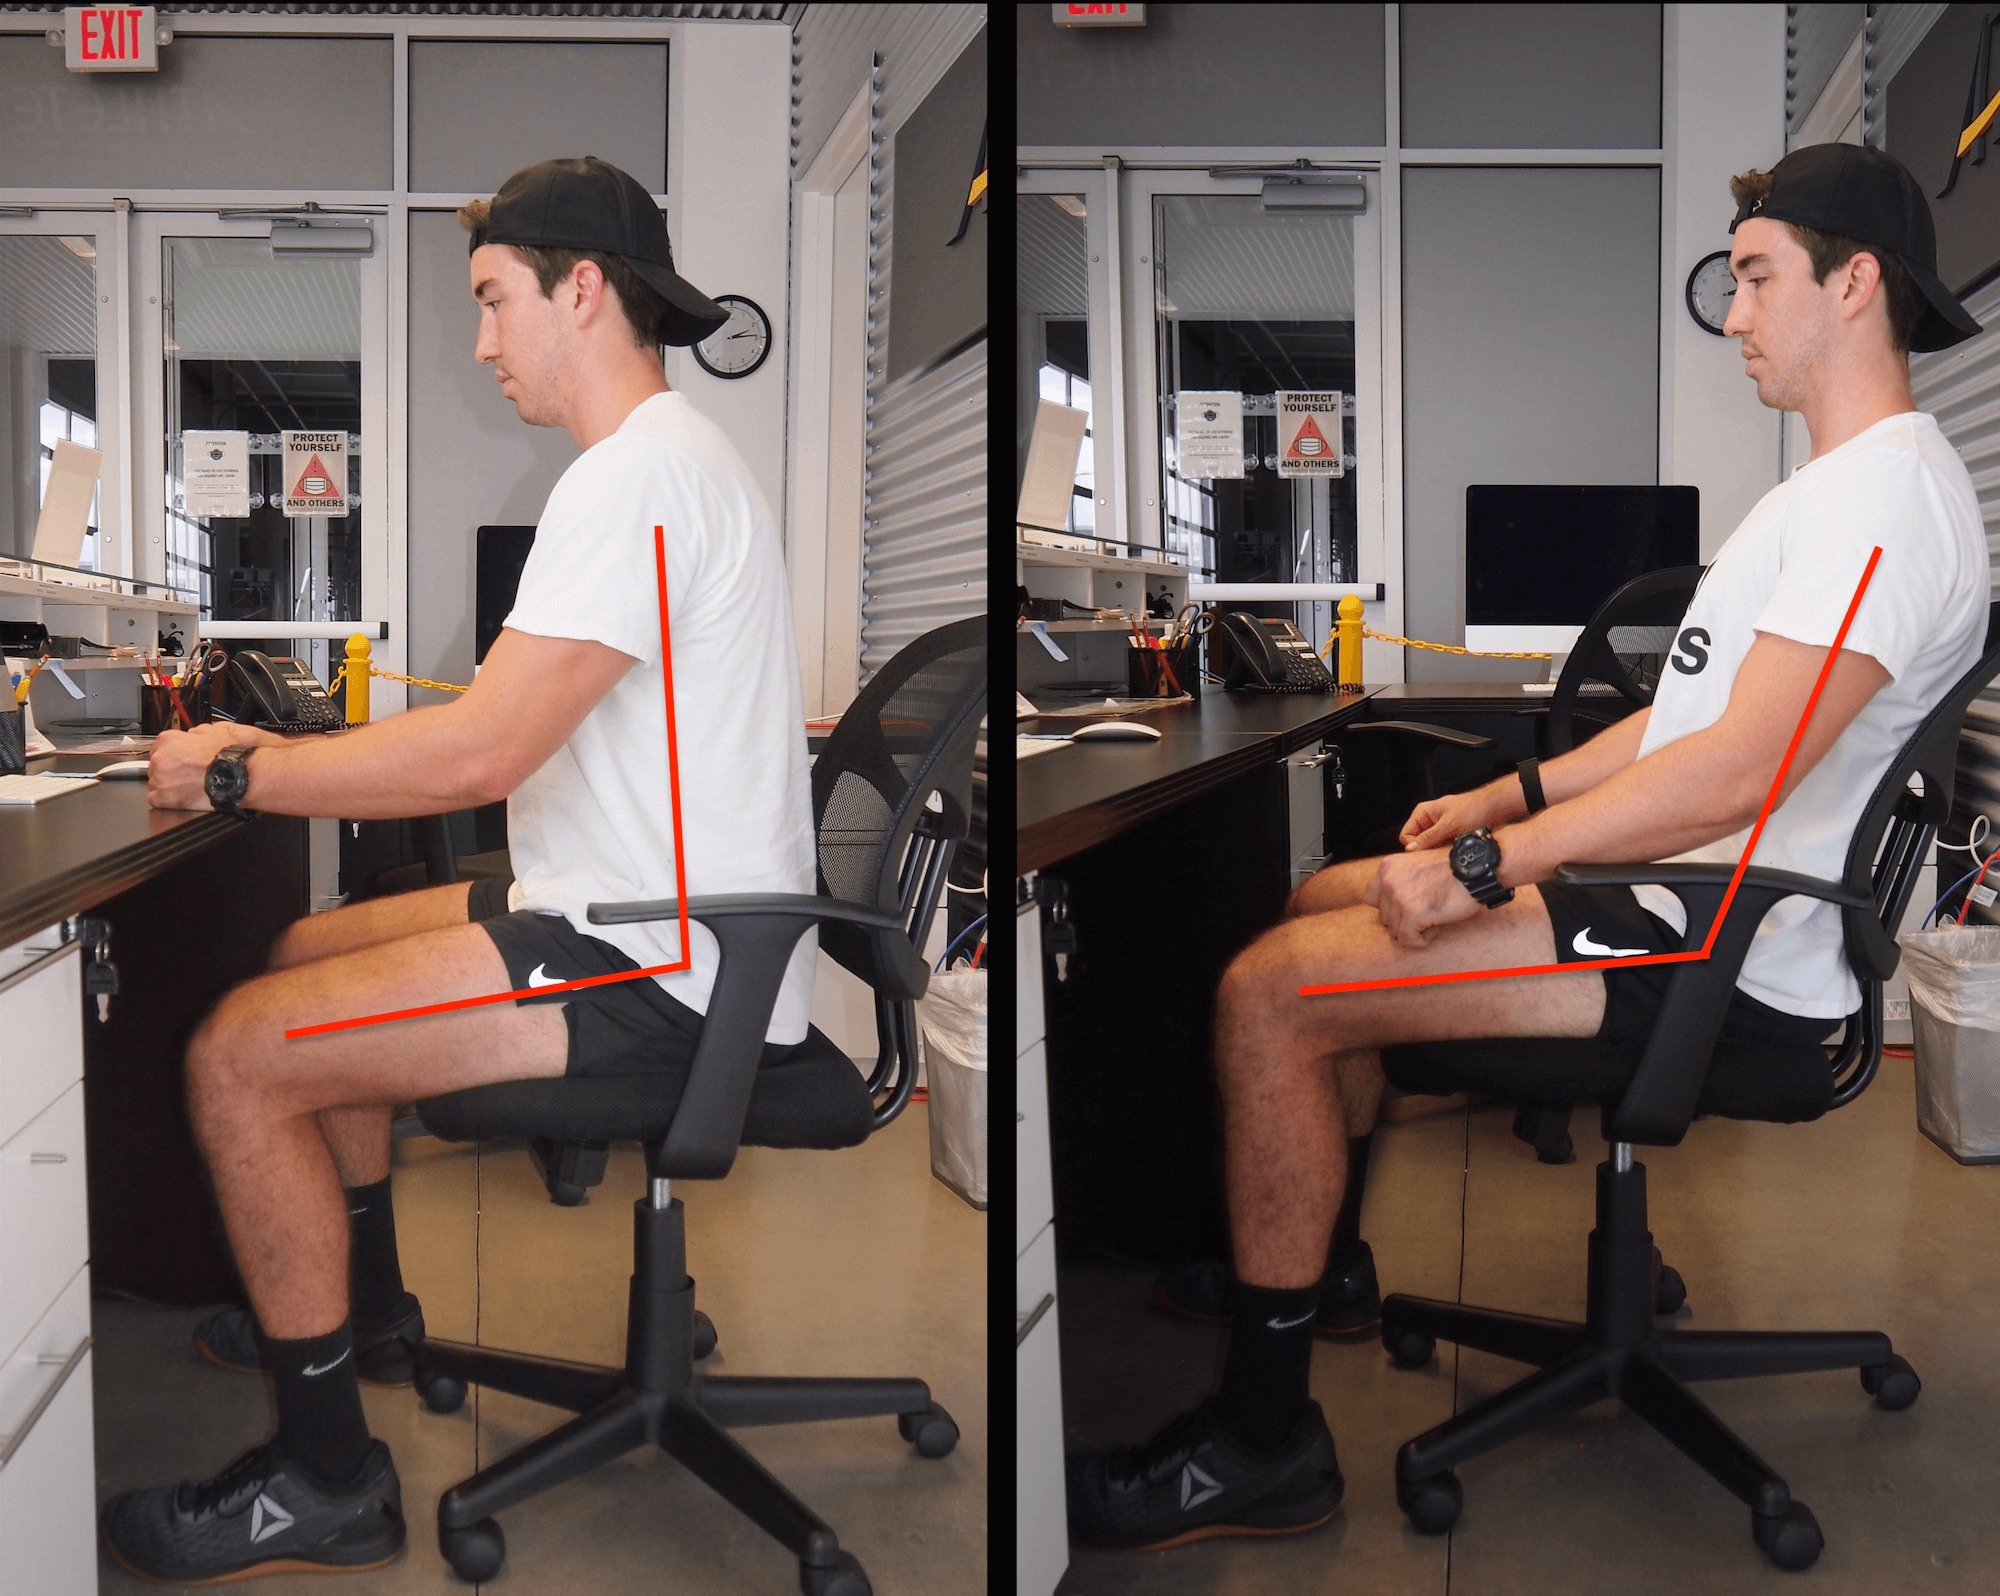
Although it’s not sexy at all (and would make a horrible title for this blog post), here’s where activity modification comes in. From the standpoint of everyday normal activities, sitting can be really irritable for someone with FAIS. While there is no single answer to describe the best sitting posture for working at your desk, there are a few tips on how to be kind to a hip that struggles with impingement. Sitting with fairly standard, erect posture with your feet flat on the ground can sometimes encourage the onset of hip pain. Imagine that we’d like to give that hip angle a bit of room to breathe. In the least, this will mean allowing yourself the opportunity to lean back every so often or adjust your desk chair to allow a slight recline. Additionally, you won’t benefit from having a stool under your desk to raise your feet up higher. Also, don’t let your knees fall in towards one another (sitting knock-kneed, falling into internal rotation) at your desk as it may aggravate your symptoms. If you have a beveled chair that encourages this, it might be time to switch out.
Seated Posture for Hip Impingement
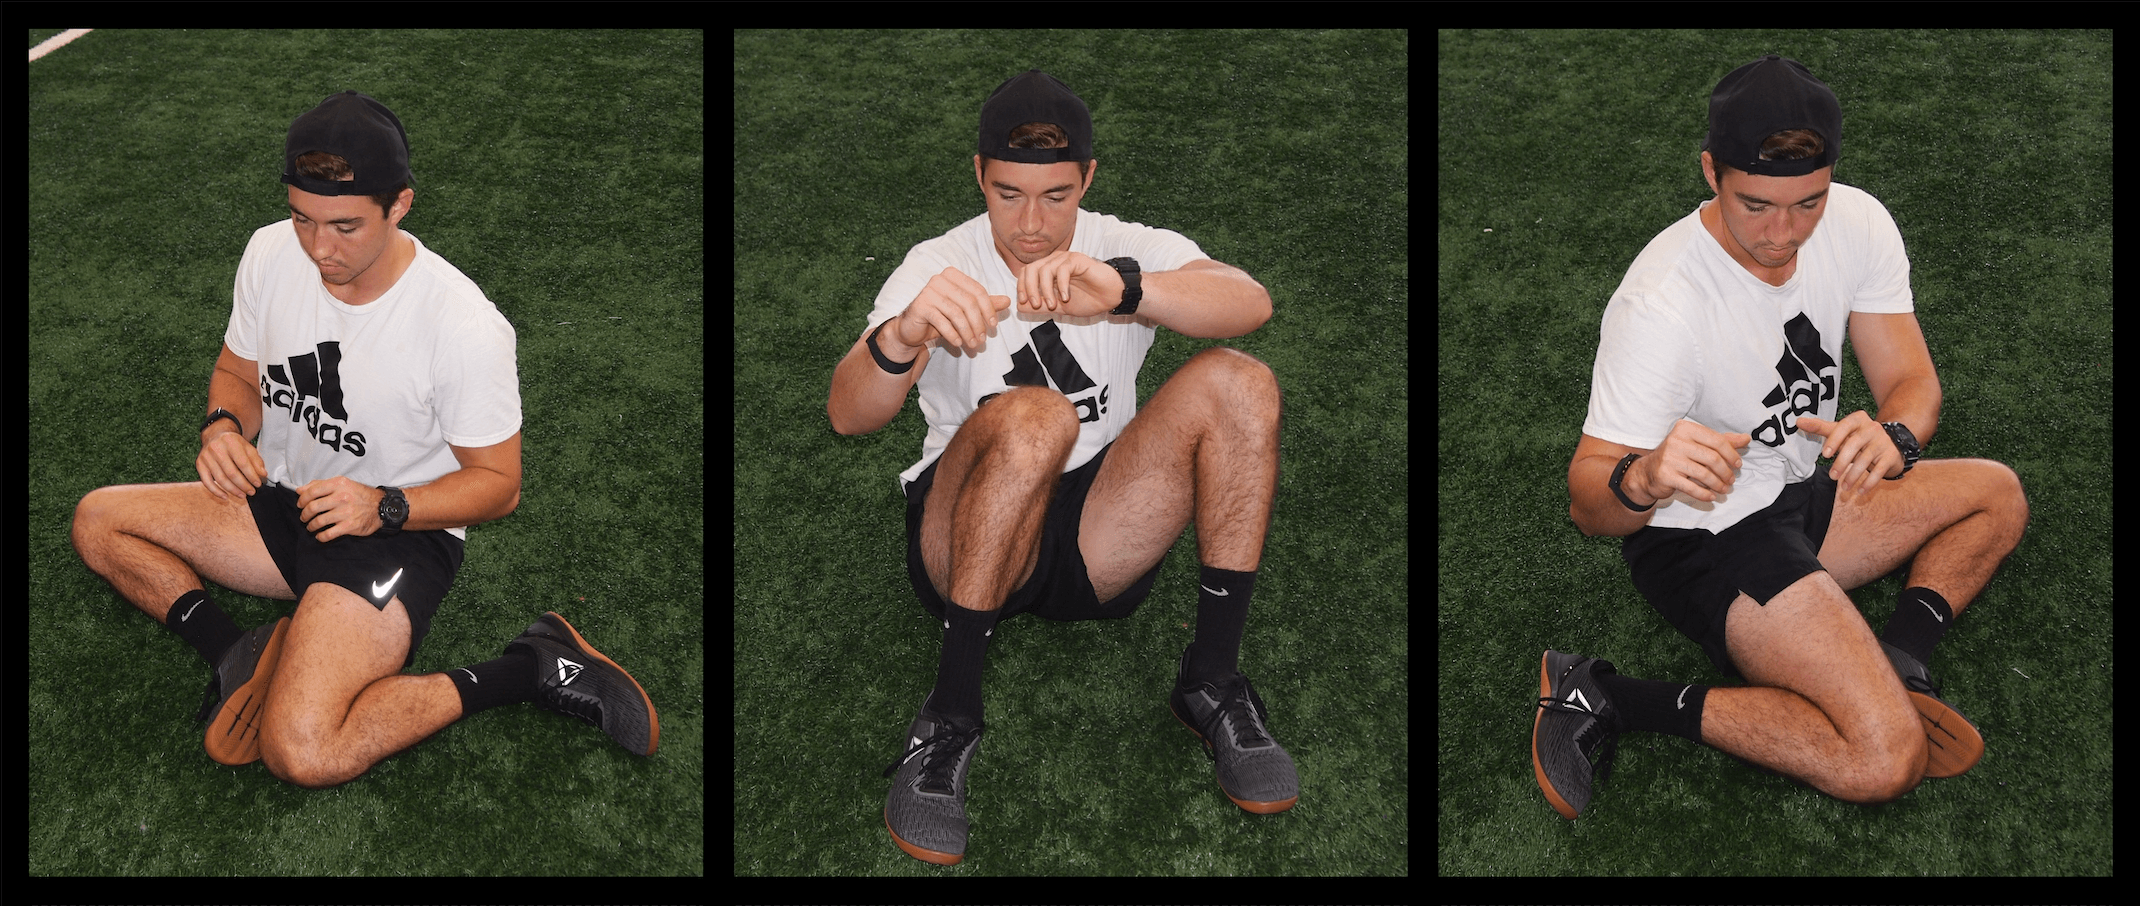
Skyview of Seated Posture For Hip Impingement
As a general rule of thumb, appreciate that the best posture is one that you spend the least amount of time in. Move often throughout your day, spending no more than 20 minutes in a single position at a time. The best case scenario is your work place offers different options to work on your computer. Standing desks are particularly helpful here. A trickier scenario are those with long commutes to work or for some who flies frequently — still try and hold some of these principles in mind the best you can!
The Squat
There is some low-hanging fruit to consider trying with your workouts as well. Despite what you hear in the weight room, squatting deep is never going to be best for a hip with morphology that predisposes it to impinge. With someone who has this anatomy, the deeper into a squat they push, the higher the likelihood of producing symptoms. Sure, you can likely get a set or two in before symptoms flare-up. But in the long game, being aggressive with depth is not going to help your symptoms. If you’re really struggling and need an external tactile cue, placing a box behind you to limit your range of motion during a squat can be particularly helpful. While most use this trick to cue depth, you’ll be using it to limit your range. I know, I know: ego usually comes into play here. Appreciate that your anatomy is the limiting factor here… not your mental toughness.
Hip Impingement and Physical Therapy: Squat Variations
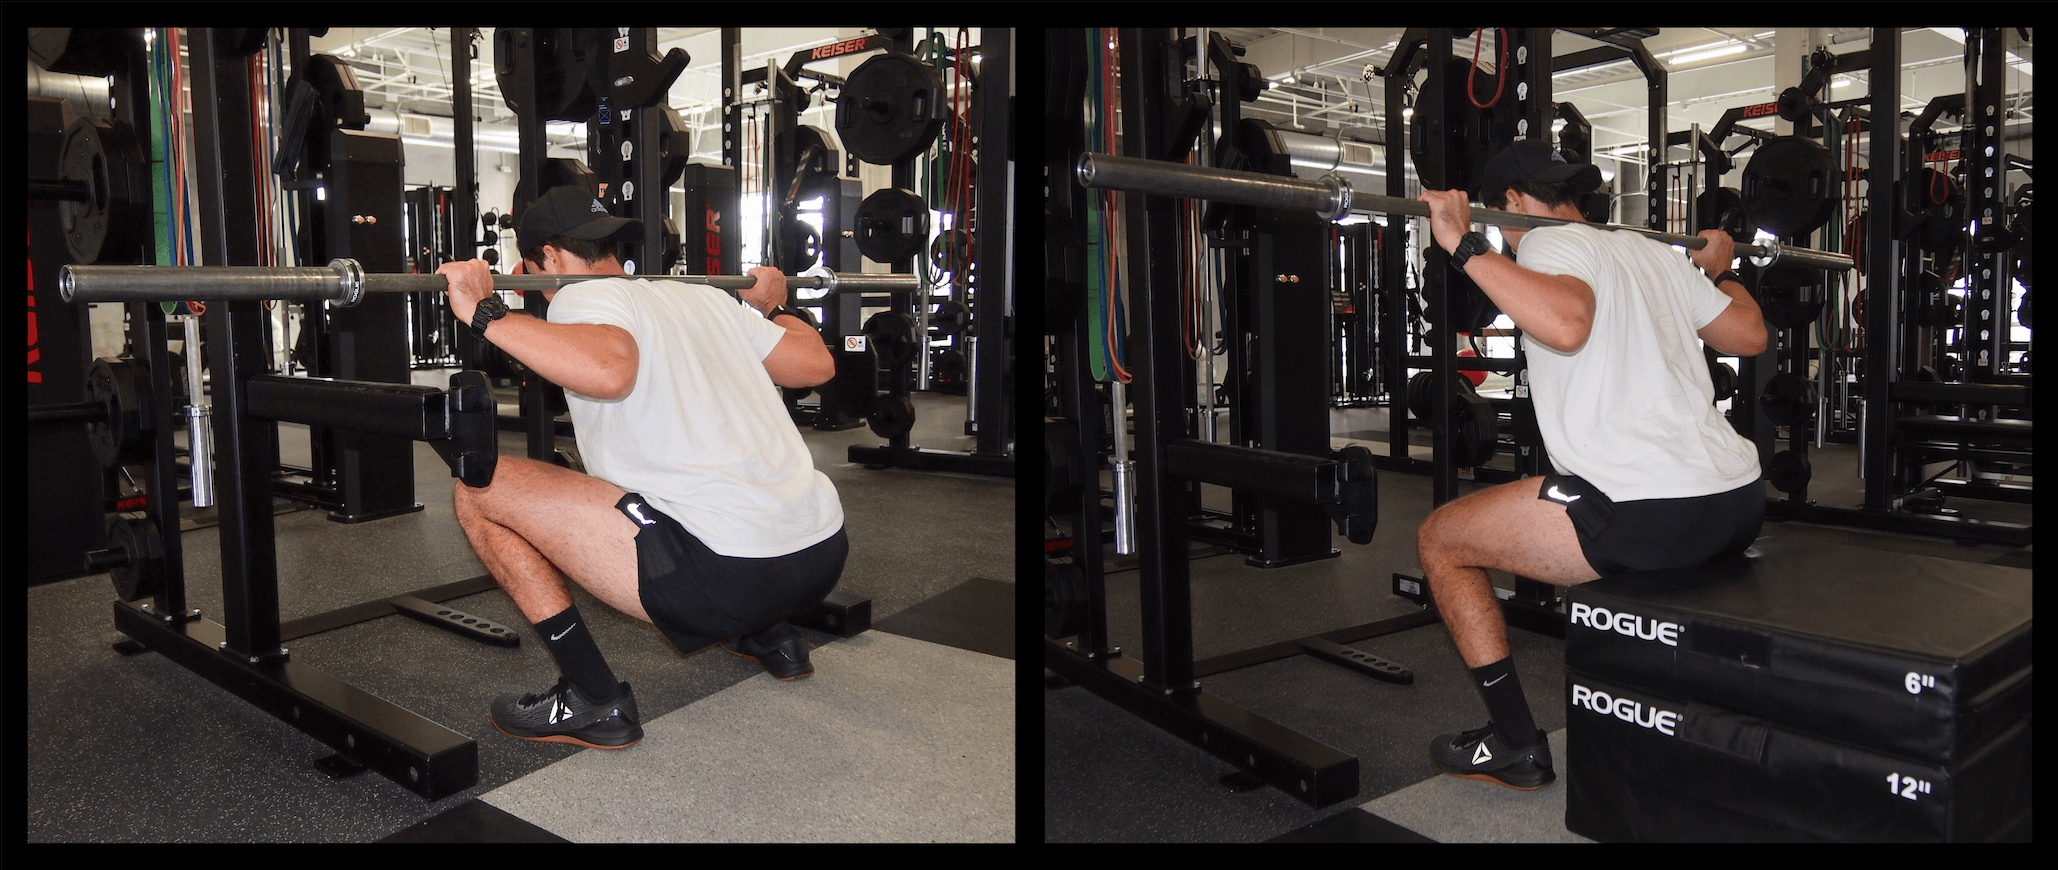
Barbell Back Squat
Sample Hip [P]rehab Program Exercise
To dive in even further, you may have heard of a quad-dominant squat versus a hip dominant squat. Essentially, a quad-dominant squat is where the placement of the barbell (consider a front squat, goblet squat) or the way squatting form is cued (let your knees pass your toes) tends to place more demand on the quadriceps or anterior musculature. Opposite of this is a hip dominant squat, where the barbell is placed in a “high bar” or “low bar” position on the back and the lifter is cued to keep their weight through their heels (don’t let your knees pass your toes). If we’re really getting into the weeds, which is better for someone with FAIS?
A landmark article out of the Journal of Strength and Conditioning Research back in 2003 investigated the amount and distribution of forces at both the knee and hip when squatting (5). There were two squatting conditions: 1) participants were allowed to do an unrestricted squat (knees pass toes) and 2) participants were asked to squat where a vertical board was placed to prevent anterior knee displacement (knees behind toes).
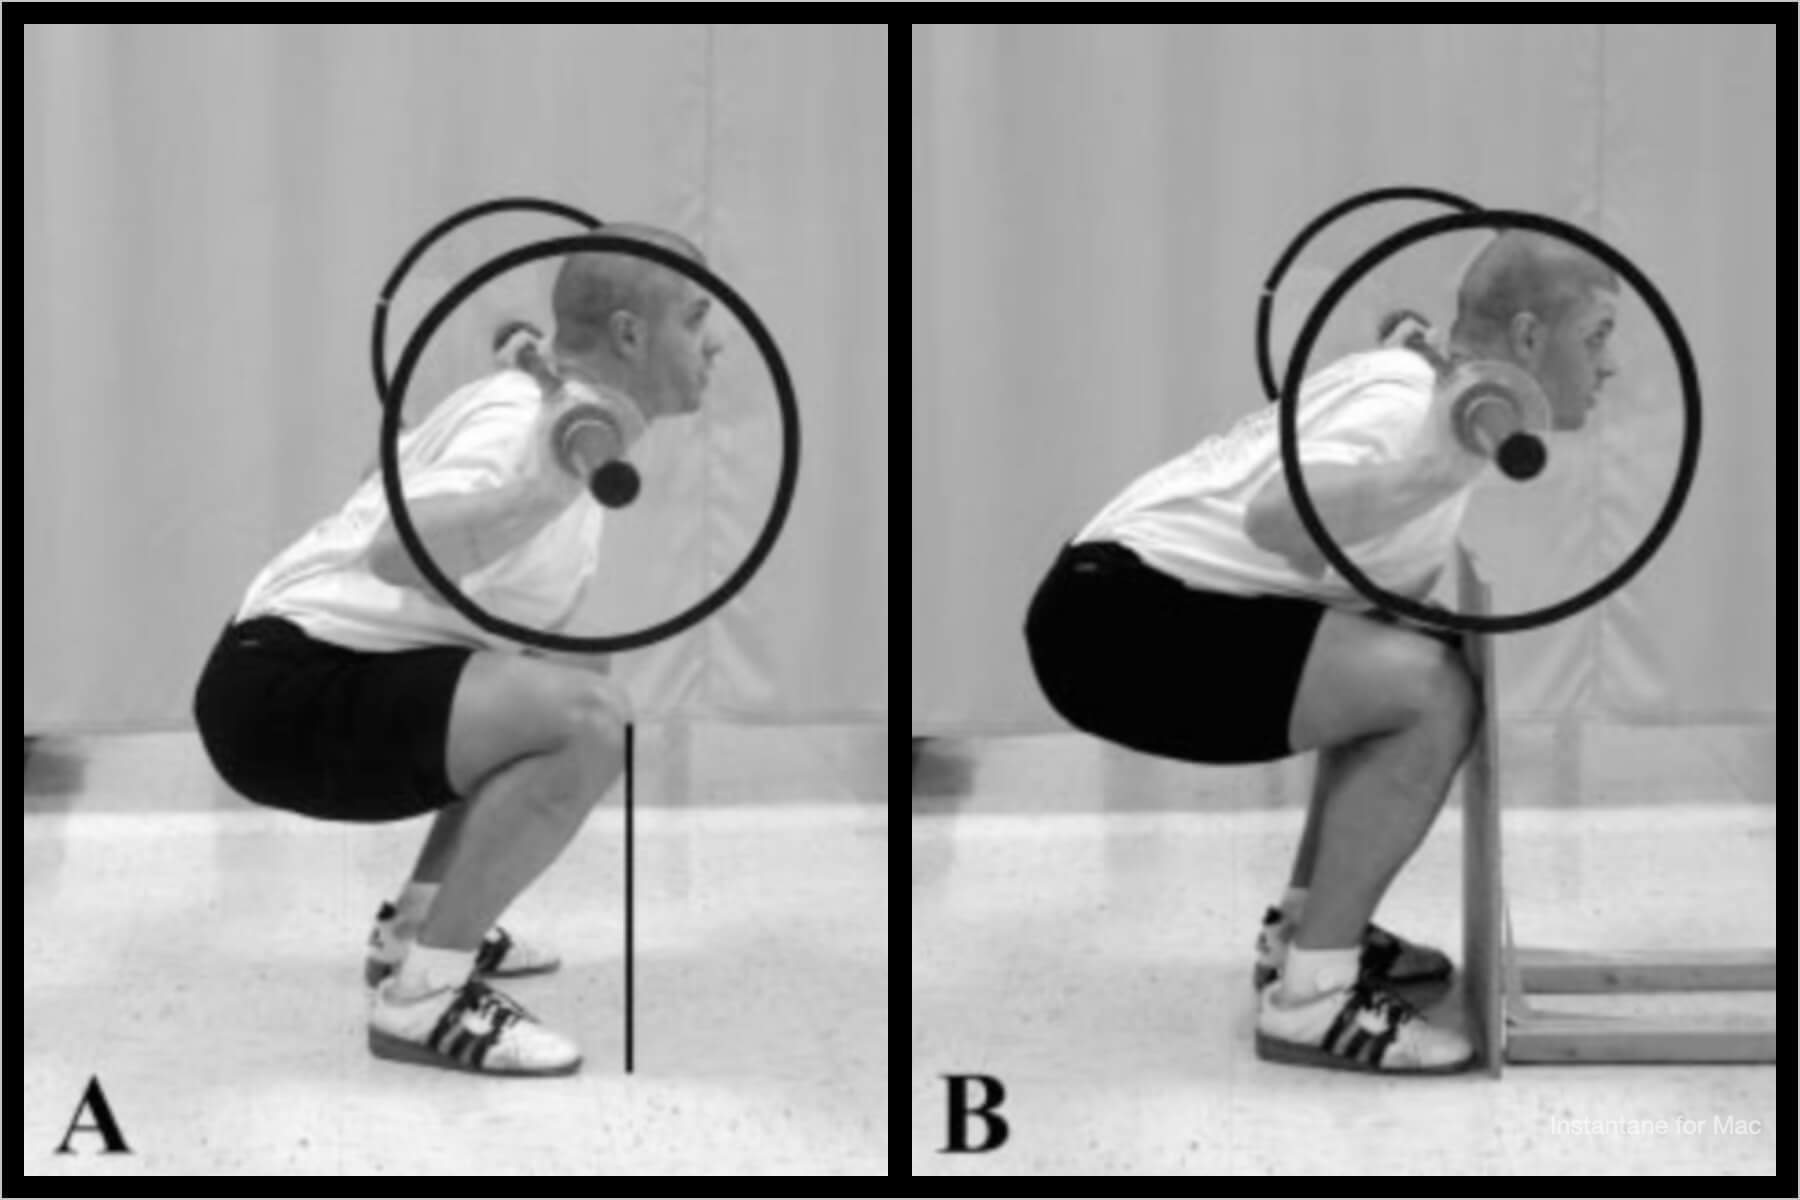
Researchers found in the unrestricted squat that forces on the knee increased exponentially. To this day, coaches continue to cue “knees behind toes” and “keep your weight through the heels” based on these findings. In the other testing condition, the restricted squat did limit the forces placed on the knee – however, the forces on the hip increased exponentially: about 10 times more than they were in the unrestricted squat!
What I’m getting at here is that if you’re controlling for squat depth, you don’t have to be worried about anterior knee translation. Let your knees move forward – it’s part of a natural squat, especially with a front squat or goblet squat. Again, your anatomy is going to predispose you a bit differently with squatting cues and mechanics. Awareness and understanding are what activity modification is all about.
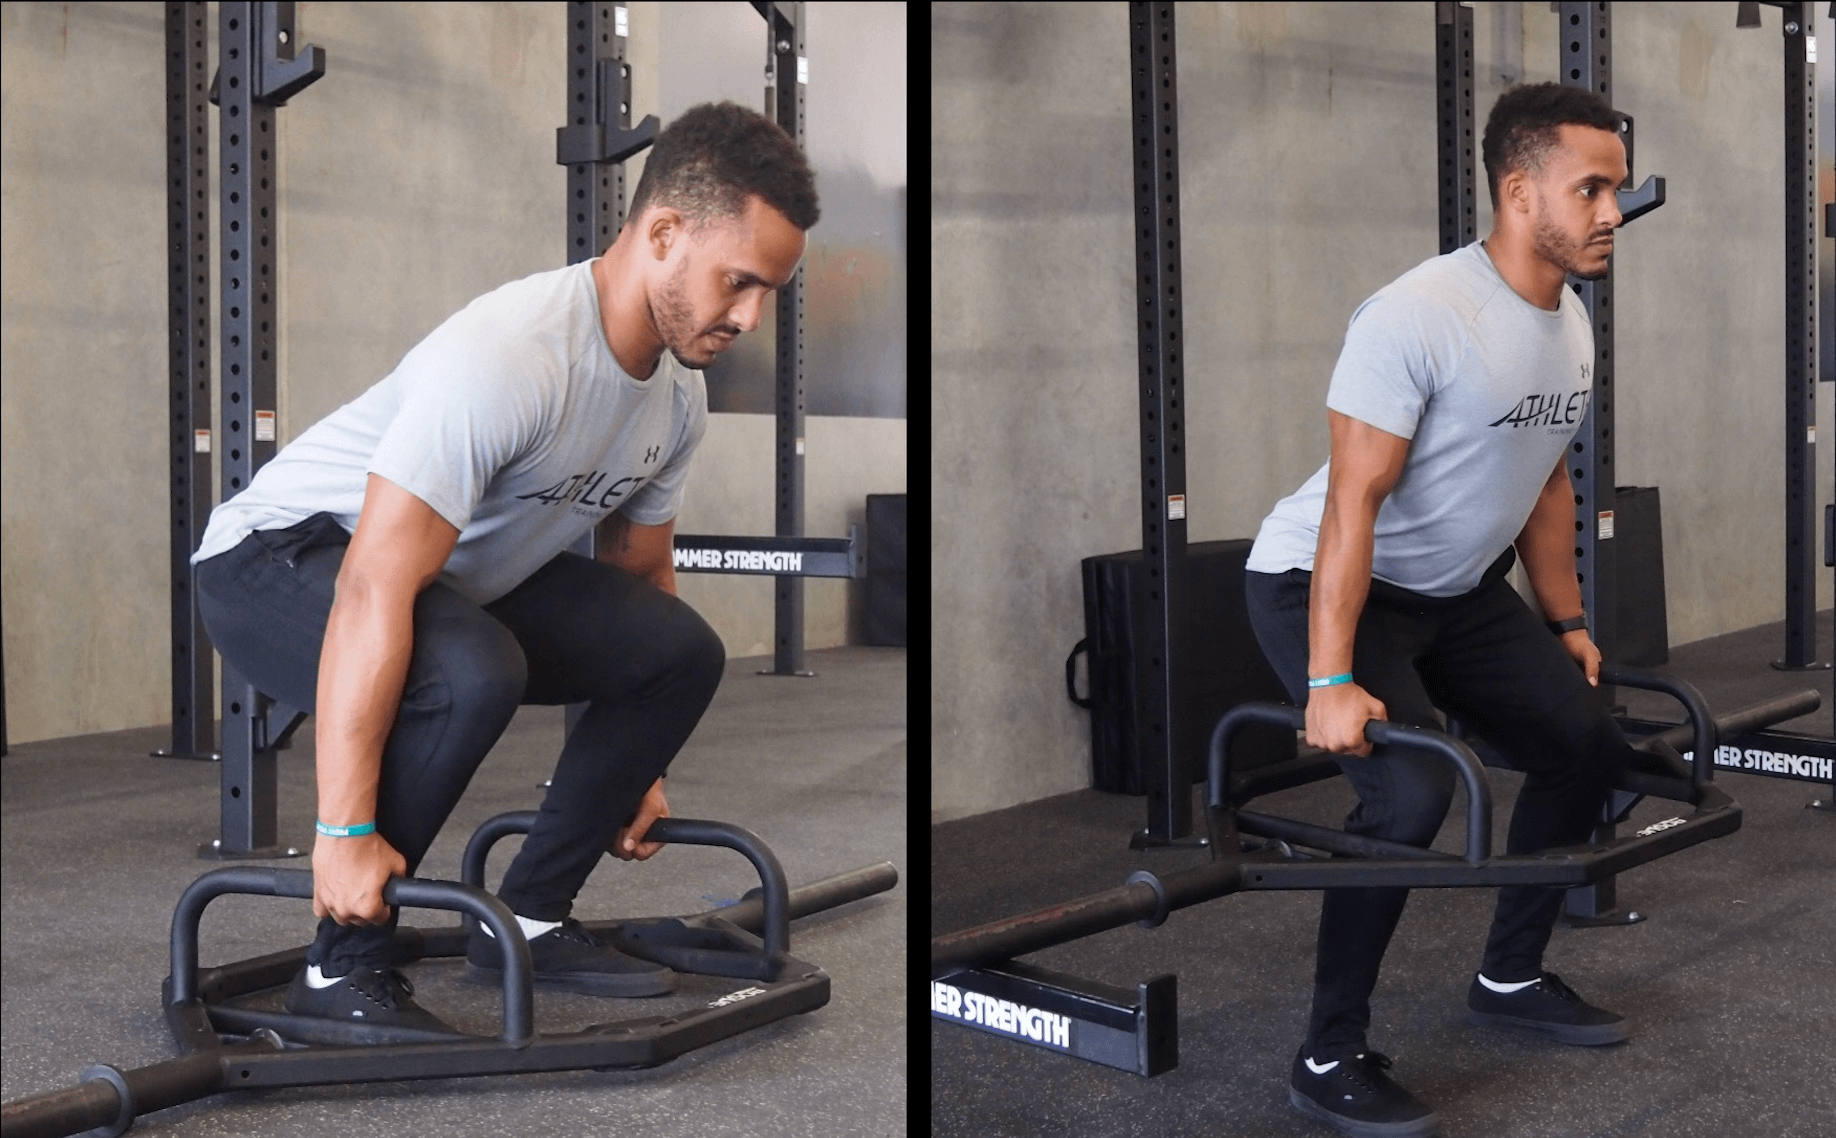
The Deadlift
This same principle can be applied to your deadlifting as well. Starting from the ground may just be too irritable for you. Appreciate that lifting from an elevated surface can make a great deal of difference with your symptoms.
Self Hip Mobilization
“Priming” and desensitizing the hip prior to exercise or activity
If you’ve ever formally seen a physical therapist for your hip, you’ve likely seen some mobilizations being performed in the clinic. Manual mobilizations are techniques used to help improve motion, decrease pain, and overall help people move better and more comfortably. Clinicians sometimes argue about the mechanisms behind how mobilizations work. This is probably another post in itself, but for our purposes here today, these help to desensitize a hip, provide temporary relief from pain and likely help improve range of motion a bit.
The bad news? Contrary to what you may hear, these likely do not change hip capsular mobility long-term. And they certainly do not change your bony morphology. The good news? Regardless of the mechanism, these can be helpful for an active individual looking to minimize hip pain with exercise. Furthermore, you don’t necessarily need a physical therapist to perform them (although in-person instruction and education from a therapist are likely most effective).
A phenomenal guy named Michael Reiman, who practices and researches out of Duke University, published a great article in The International Journal of Sports Physical Therapy in 2013. In this article, Dr. Reiman demonstrates and explains several different self-mobilizations that those with restricted hip mobility can perform (6). Often used as “primers” prior to exercise, or as ancillary work throughout a resistance training program, these can be extremely useful. I wanted to outline a few of my favorites. Of course, to see the full article, check out the references below.
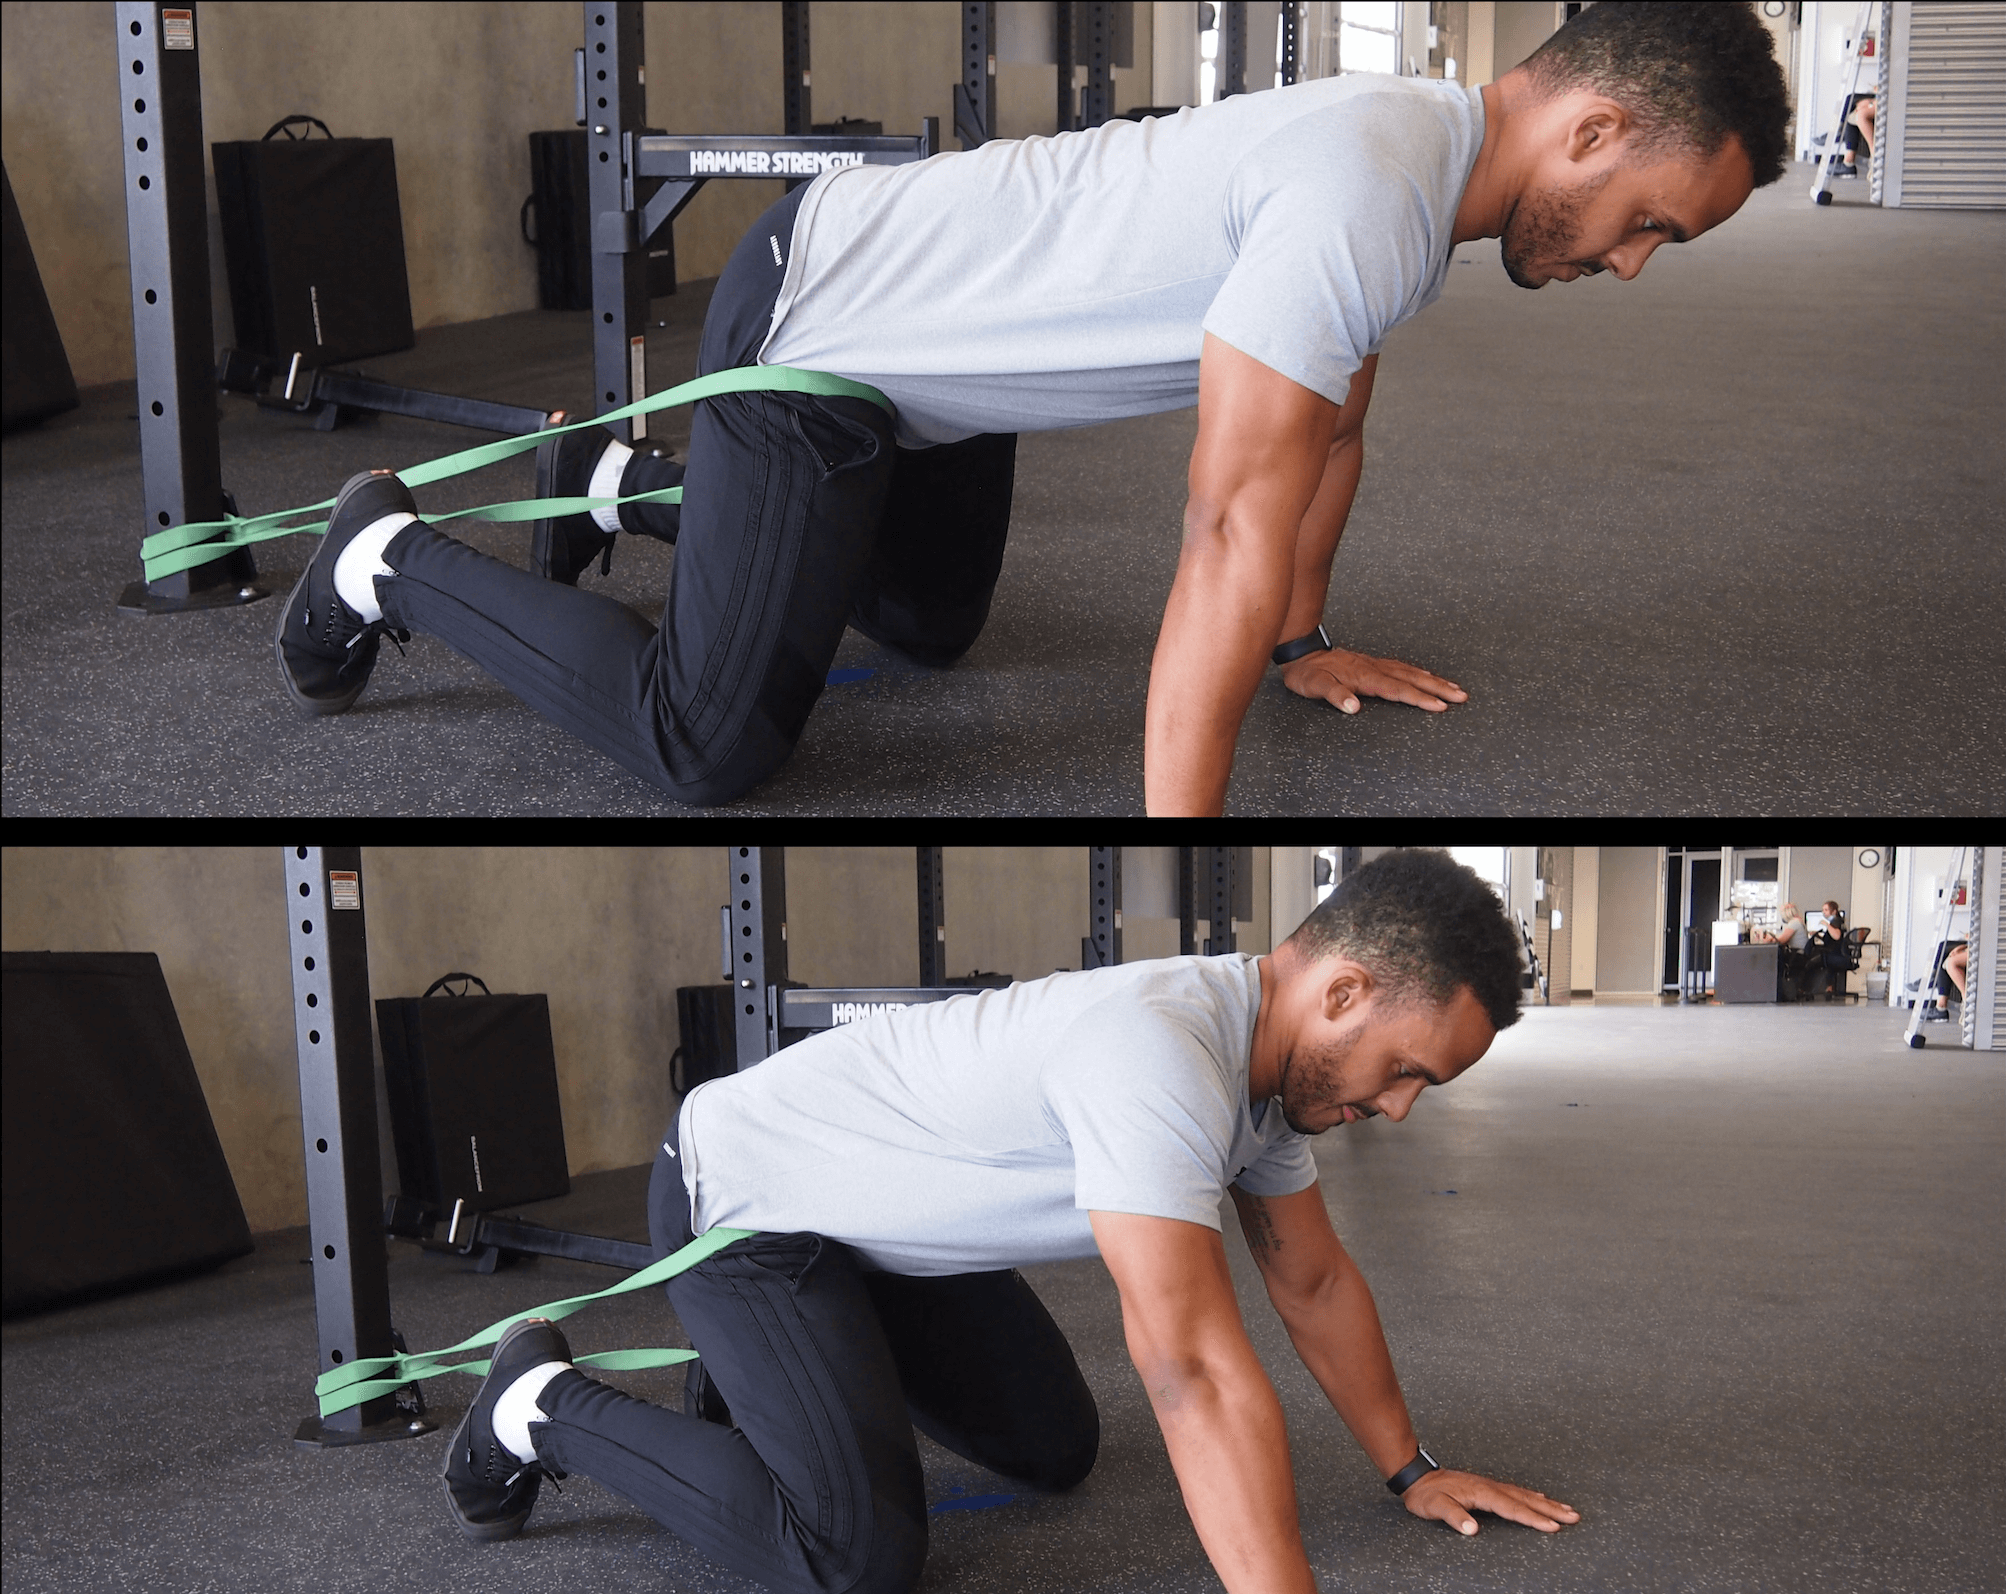
QUADRUPED INFERIOR-POSTERIOR MOBILIZATION
This mobilization is meant to improve hip flexion and decrease symptoms of impingement at the hip. In its simplest form, it should hopefully mitigate some of the symptoms you may experience as you move towards the bottom of your squat.
For this, you’ll need a thick mobilization band. Anchor your band around something sturdy, as close to the ground as possible. The bottom of a squat rack or a solid leg of a bed frame tends to work well. Place the band as close to where your thigh meets the torso to most directly mobilize the hip joint. Next, get down into a quadruped position (hands and knees), and walk yourself away from the anchor, tensioning the band.
From here, you should feel a nice distraction at your hip. If not, increase the tension of the band or inch yourself out further. It should be a deep, comfortable sensation. As shown in the picture below, gently rock your bottom back towards your heels. Stop briefly, then return to your original starting position. If you reproduce symptoms of impingement at the front of your hip, you’ve likely gone too far. Experiment with depth, band tension, and band placement – perform for a few minutes prior to squatting. Or, program these as an ancillary or supportive exercise in-between primary lifts in your routine.
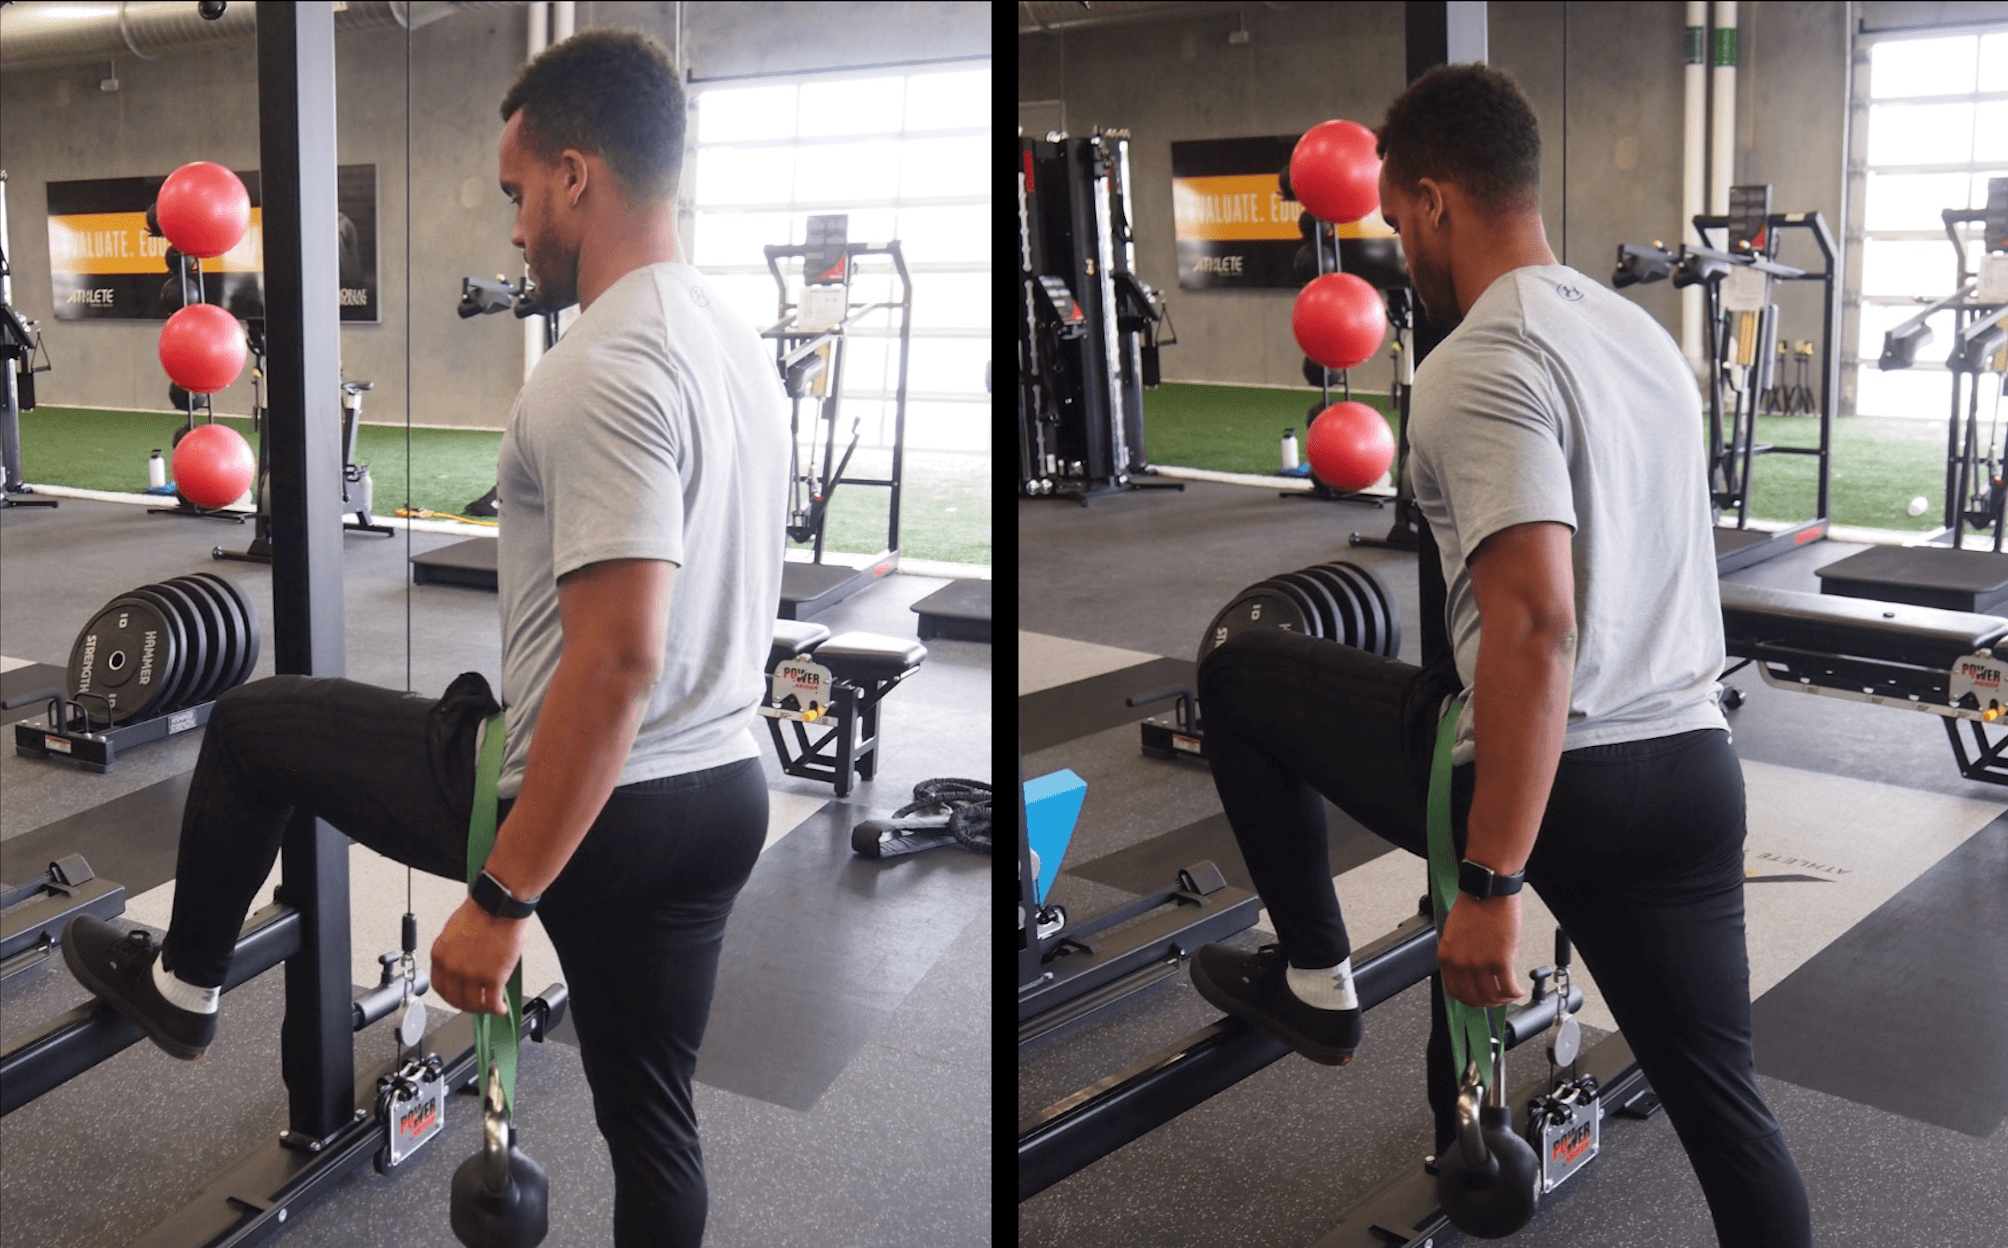
STANDING INFERIOR HIP MOBILIZATION
This mobilization is also meant to improve hip flexion and decrease symptoms of impingement at the hip. In its simplest form, it should hopefully mitigate some of the symptoms you may experience as you move towards the bottom of your squat. Considering the specificity of the exercise, it may have may directly benefit the front leg of your lunge.
As with our first exercise, you’ll need a thick mobilization band. Secure this firmly around a heavy kettlebell. Depending on your size and overall frame, you may need to adjust the weight. Our model here, performance coach Chris Slocum, is using a 25-pound kettlebell. For someone smaller, a 10 or 15-pound kettlebell would do. Next, place the other end of the mobilization band as close to where your thigh meets the torso. Place that leg on an elevated surface like a low safety bar on a squat rack or a small plyobox.
The weight should be comfortably suspended in the air. If it touches the ground, shorten the band. The force of the distraction should be directed towards the ground. From here, gently lunge forward, comfortably mobilizing the hip. Experiment with depth, band tension, and band placement – perform for a few minutes prior to squatting. Or, program these as an ancillary or supportive exercise in-between primary lifts in your routine.
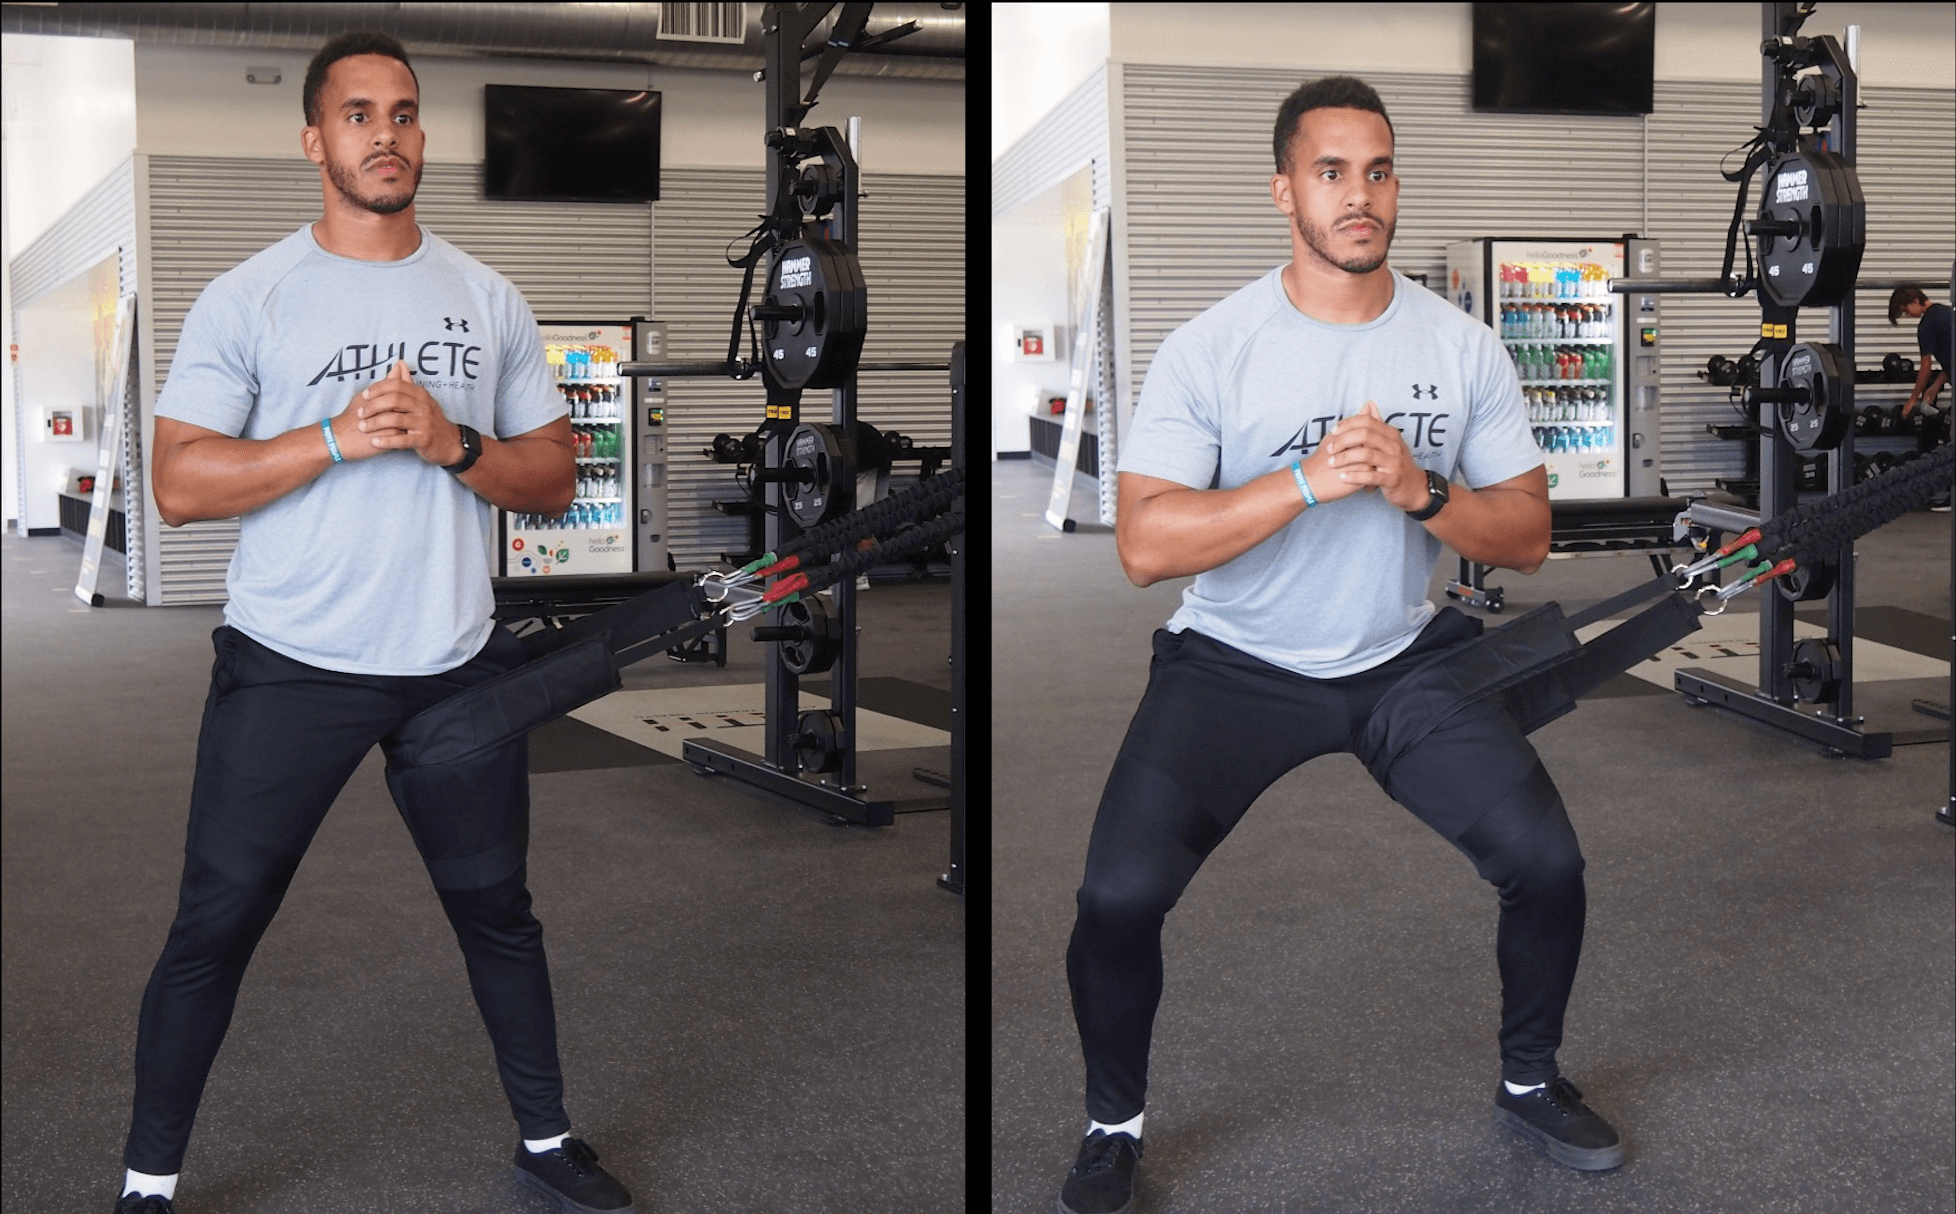
HIP LATERAL MOBILIZATION
Offering a slightly different mobilization and “feel” than the previous two exercises, this mobilization provides for a lateral distraction. It should also help improve how your squat feels. An added benefit of this exercise is that you can load it. Consider holding a kettlebell to turn this into a goblet squat if you wish. Otherwise, it can be used as a primer or programming into your normal routine as you see fit.
Using a thick mobilization band (or in this instance, some suspension cables hooked up to a mobilization pad), place the band as close to the inside of your leg where your thigh meets your torso. The anchor of this band should be directly to your side. However, you can experiment a bit here: Chris prefers to add a little height to the anchor, so it’s just above waist height. Stick with what provides the most distraction and relief.
Take a few steps away from your anchor, making the band nice and taunt. From here, perform some squats. If you feel impingement, back off of your depth. Otherwise, feel free to experiment with band tension, band placement, and squatting mechanics. Use this as a primer before squatting, or program in-between sets.
Closing Thoughts
In summary, some of the major points we’ve covered here regarding hip impingement and physical therapy…
- Femoroacetabular impingement syndrome is a mechanical / impingement issue where two bony surfaces press against one another. The head and neck of the femur and the socket.
- This usually occurs with long durations of sitting and or with some positions experienced in weight lifting (squats and deadlifts).
- Both physical therapy and surgery can help with your symptoms. We recommend finding your “ceiling” with physical therapy and conservative care first, which you should get an appreciable window in a matter of 6 to 8 weeks.
- A hip-centric physical therapist and hip arthroscopist can help guide you in determining treatment options and decision-making.
- Activity modification is more influential on pain mitigation than most give it credit for. Always try and keep your hip angle more open than closed with daily activity.
- Some self-mobilizations may be of some benefit prior to exercise. These won’t cure your impingement, but they can help manage symptoms.
Understanding FAIS is half the battle in itself. Choosing the medical team wisely around you will greatly help in the management of your hip pain. As always, your recovery will start with you. Our hope is this article will help you to take the first steps in doing so. Best of luck!
Take Ownership of Your Hip Health
To go from stepping to sitting we can thank the 27 muscles that cross the hip joint for their work. After thanking them, we should also thank your core, knees, feet and really the rest of your movement system as they work together on a team to create movement. Perhaps, the best way to thank them is by giving them what they desire: strength and power!
REFERENCES
- Griffin DR, Dickenson EJ, Donnell JO, et al. The warwick agreement on femoroacetabular impingement syndrome (FAI syndrome): an international consensus statement. Br J Sports Med. 2016; 50: 1169-1176.
- Palmer AJ, Gupta VA, Fernquest, et al. Arthroscopic hip surgery compared with physiotherapy and activity modification for the treatment of symptomatic femoroacetabular impingement: multicenter randomized controlled trial. BMJ. 2019; 364: 185.
- Mansell NS, Rhon DI, Meyer J, et al. Arthroscopic surgery or physical therapy for patients with femoroacetabular impingement syndrome: A randomized controlled trial with 2-year follow-up. AJSM. 2018; 46: 1306-1314.
- Griffin DR, Dickenson EJ, Wall PD, et al. Hip arthroscopy versus best conservative care for the treatment of femoroacetabular impingement syndrome (UK FASHIoN): a multicenter randomized controlled trial. The Lancet. 2018; 391: 2225-2235.
- Fry AC, Smith JC, Schilling BK, et al. Effect of knee position on hip and knee torques during the barbell squat. Journal of Strength and Conditioning Research. 2003; 17(4): 629-633.
- Reiman MP, Matheson JW. Restricted hip mobility: Clinical suggestions for self-mobilization and muscle re-education. Internal Journal of Sports Physical Therapy. 2013; 8(5): 729-740.
About The Author
Chris Lefever PT, DPT, SCS, CSCS, USAW
[PrRehab Writer & Content Creator
Originally from Reading, Pennsylvania, Chris graduated with his bachelor’s degree in exercise science and a doctorate of physical therapy from Slippery Rock University. He afterwards completed a sports physical therapy residency at the Memorial Hermann IRONMAN Sports Medicine Institute. He later left Texas to complete a division 1 sports physical therapy fellowship at Duke University where he worked closely with Duke football, basketball and lacrosse. He returned to Houston afterwards to continue his career in sports physical therapy. Chris currently practices in Katy, Texas at the Memorial Hermann IRONMAN Sports Medicine Institute. Chris is board certified sports clinical specialist and certified strength and conditioning specialist. He serves as a residency site coordinator for the sports physical therapy residency and the program coordinator of an emerging division 1 sports physical therapy fellowship. He has a particular interest in post-operative rehabilitation of the athletic knee, shoulder, hip and elbow.
Email: chrislefever73@gmail.com
Twitter: @chrislefever
Disclaimer – The content here is designed for information & education purposes only and is not intended for medical advice.
About the author : Chris Lefever
Related posts

Latest Blogs

Get Proactive with Prehab
- ✔ Zero wait times, no hidden fees, no barriers to entry!
- ✔ Get out of pain, get stronger, and improve your mobility
- ✔ Access to easy-to-digest physical therapy education videos & resources to learn about your body in the palm of your hand
- ✔ Guidance from trusted Doctors of Physical Therapy


