

On this page 8 sections
Your guide
What you'll learn
Hip strengthening should be stable in any rehabilitation or strength and conditioning program. The hip musculature is capable of generating large amounts of torque used for explosive athletic movements. Additionally, the hips are the key to trunk and core stability, and therefore balance. To be simplistic, our trunk sits on top of our hips. Thus, if our hips are weak, it doesn’t matter how much core strengthening we do, because the foundation on which our core sits is weak. Moreover, we need to ensure that our hips are not only strong but stable! In this article, we are going to show you the essentials of how to improve hip stability with prehab exercises!
The Importance of Hip Stability
A great analogy in regards to hip stability is that of a house on the cliffs. You could build the biggest and most glorious house (i.e 6-pack) on the cliffs overlooking the ocean, but if the stilts and foundation (i.e hips) upon which this mansion sits are weak, the house will undoubtedly collapse. This is why our hips need to be strong and stable, so we have a solid foundation to move from! The hip joint is not only very stable innately, but also very mobile, as it is a ball and socket joint that moves in all 3 planes of motion. Therefore, when we work on hip stability, we need to stabilize in each of those different planes of motion.
Maximize Your Hip Stability With Prehab

Our Hip Prehab Program has been specifically designed not only to optimize hip stability but all other components that are essential for optimal hip health. This program consists of all the pillars needed to bulletproof your hips, and prepare you for any activity you want to partake in. Get started HERE.
How To Test Hip Stability
There are a variety of ways to test hip stability. Firstly, you want to ensure that the hip is being tested in all 3 planes of motion: sagittal, frontal, and transverse, as the hip moves in all of these planes! If the hip is lacking stability in one or more of these planes, that needs to be addressed!
Exercise 01 of 05
Exercise demonstration
Single Leg Squat For Time Assessment
View exercise instructions
Fixing Your Pelvic Drop & Why It's Important
Exercise 02 of 05
Exercise demonstration
Copenhagen Adductor Max Rep Assessment
View exercise instructions
The adductors are a powerful group of muscles that are heavily involved in rotational athletics. It is the second behind hamstring strains in regards to the most common muscle injuries at the hip in athletes. These muscles also help stabilize our pelvis in upright, standing positions. To learn more about advanced groin training, read the article below!

Progressive Eccentric Single Limb Squat Strength
The single limb squat comes in a lot of variations regarding body position. Building dynamic muscle function must incorporate training every type of muscle action, including eccentrics. The lowering phase towards the ground in all squatting motions requires eccentric muscle strength. The body is essentially a system of cranes (muscles) with multiple integrated pulleys (joints/tendons/ligaments) that can slowly lower the weight of the body.
What’s more important is you need eccentric strength prior to dynamic concentric strength, you must learn to absorb force before you can produce it. If your performance of the task decreases as you increase depth, you’re not ready to progress! Remember to always promote quality over quantity, optimal active performance of a task using muscles rather than tension from passive structures is key to the longevity of your movement system! Stay tuned for a full week of posts focused on the hip, knee, and lower extremity!
Here are some progressions if you are working on improving your single leg squat depth!
Exercise 03 of 05
Exercise demonstration
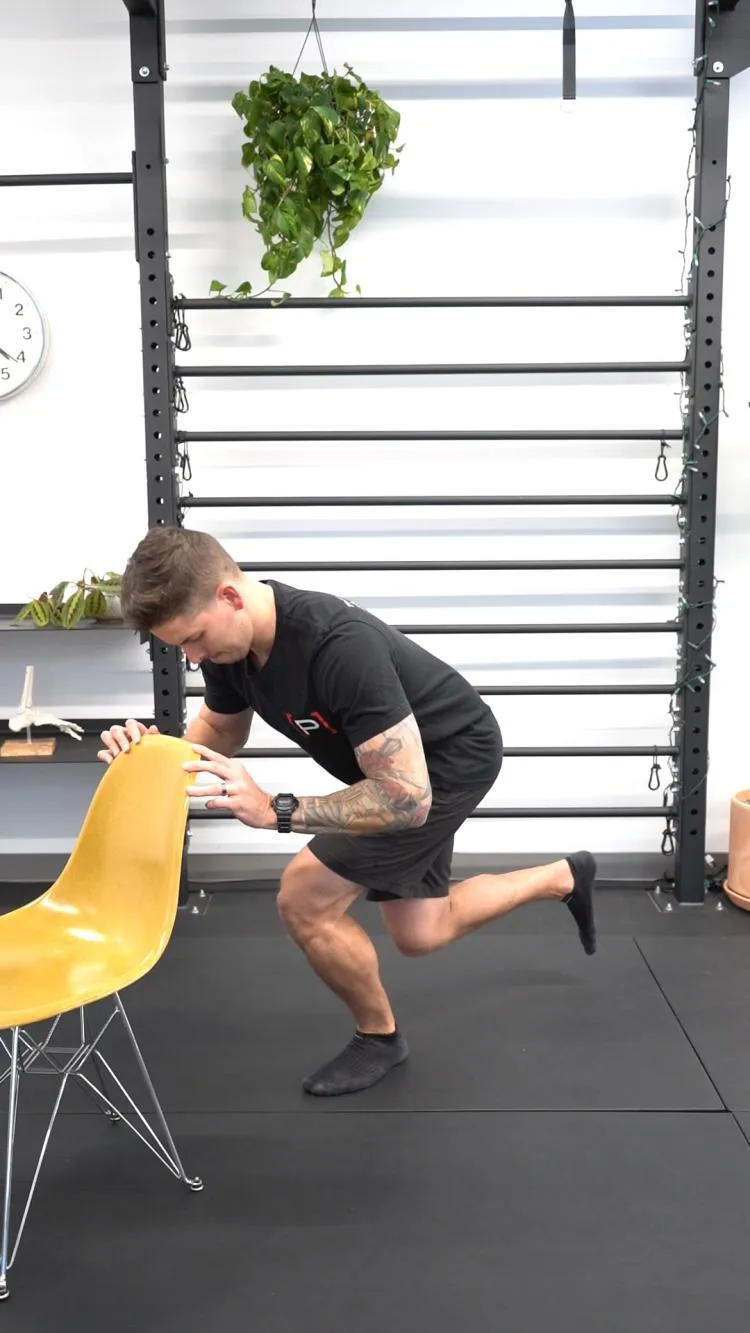
Single Leg Squat - Supported
View exercise instructions
- HOW: Start in a standing position balancing on one leg with your hands holding onto a sturdy surface/object to help with balance. Perform a skater squat by bending at your hip and knee, also let your upper body lean forward by hinging at your hip. Return to starting position, repeat.
- FEEL: You should feel all the muscles in your leg working, especially your glutes and your quadriceps. You may feel your core working as well to maintain torso position.
- COMPENSATION: Do not lose balance, try to keep your knee tracking over your foot, do not let your knee cave in/out. Do not let your pelvis sag on the other side. Do not over-rely on upper body support.
Lateral Step Down To Improve Hip Stability
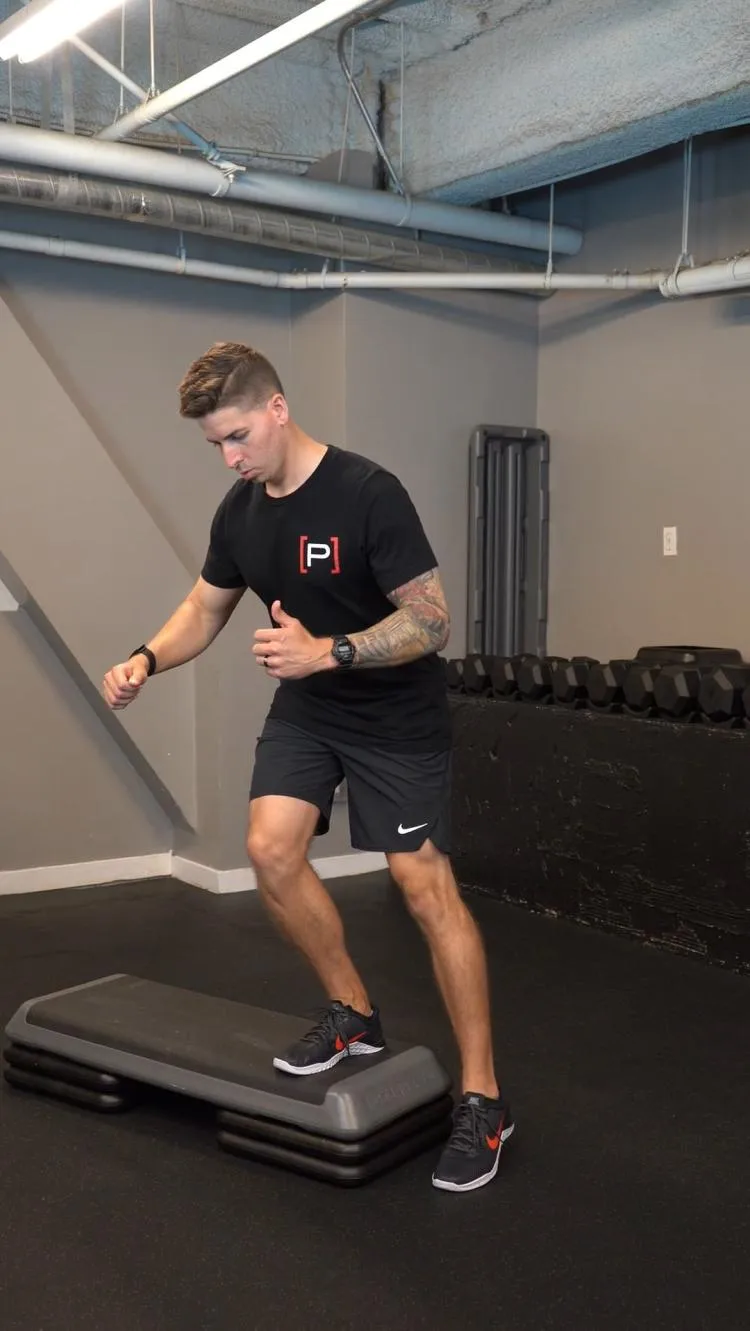
A step down is a large component of most people’s everyday life. This movement can be used as a quick & functional screen for hip stability in the frontal plane (left to right). For optimal mechanics you want the hip, knee, & ankle to be in the alignment shown with the first repetition. Compensations that are common are that one hip falls into adduction forcing the knee to go into a valgus or collapsed position, resulting in the knee being medial to the ankle joint. This is often due to either weak hip abductors or poor neuromuscular control at the hip. This deviation from the optimal movement pattern can lead to an increase in reliance on passive structures. Stay tuned for tips on how to strengthen or improve neuromuscular control at your hip to keep ideal mechanics!
Exercise 04 of 05
Exercise demonstration
Lateral Step Down
View exercise instructions
- HOW: Stand on the edge of a box/step and balance with all of your weight on the leg you want to exercise. The other leg will be hovering off the edge of the step. Slowly lower your hips, lightly tap the ground with your leg that is in the air, and then come back up.
- FEEL: You should feel all of the thigh muscles and butt muscles working in the leg that you are standing on.
- COMPENSATION: Don’t let the knees cave in or bow out. Be sure to maintain equal weight distribution throughout the entire foot of the standing leg.
Clams To Improve Hip Stability
If neuromuscular control was not the culprit of one’s hip instability, I would bet my lunch money that it is due to hip weakness. Clams are a great way to isolate the hip stabilizing muscles, especially the Gluteus Medius. If you are interested in learning more about where to start with a strengthening program, listen to the podcast episode below.
LISTEN: HOW TO BEGIN STRENGTH TRAINING

The Gluteus Medius is more than just a hip abductor and external rotator; it is used as a dynamic stabilizer during single limb stance activities such as walking, jogging, or descending stairs. Despite clams being such a commonly used exercise, it is very easy to compensate with other muscles during this exercise. To learn the best exercises for the glute med, read this article!
Exercise 05 of 05
Exercise demonstration
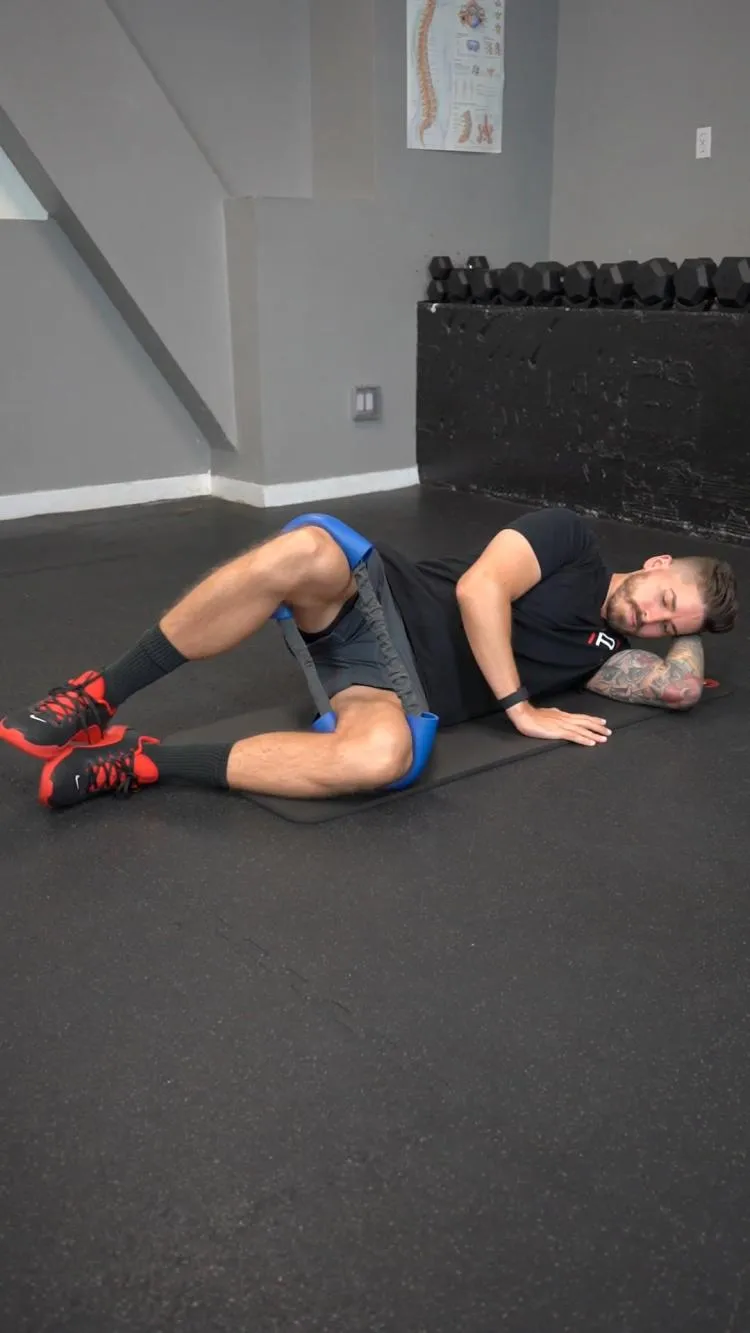
Isometric Sidelying Clam - Band
View exercise instructions
- HOW: Begin by lying on your side with your leg together. Slightly bring your knees up towards your chest. Loop a band around both knees. From here, use the top knee to push against the resistance while your feet stay together. Bring that knee up and hold it for the prescribed amount of time and reps.
- FEEL: You should feel your hip muscles working.
- COMPENSATION: Don’t lean back and open up your hips as you push against the band.
Performing Alternating Dynamic Lunges
A very popular and common exercise performed during training sessions is the dynamic lunge. It is a very functional movement due to the end position (half-kneeling), which is used very often when performing daily activities. It requires hip and trunk strength as well as stability in all planes of movement, thus it is a very functional movement! It also requires neuromuscular control and hip and pelvis dissociation due to having to let your hips flex while minimizing pelvis and spine motion.
Try Bosu Airplanes To Improve Your Hip Stability!
Bosu airplanes are the perfect exercise for challenging hip stability without any ankle contribution. Bosu airplanes can be used as an assessment test to determine if an athlete is properly recruiting from the hips during single leg movements. Or they can be used as a rehabilitation exercise for foot/ankle patients who are currently non-weight bearing. Additionally, bosu airplanes can be used as a strength and conditioning exercise to dynamically challenge a patient’s ability to control perturbations of balance using only the hip for stability. Bottom line - bosu airplanes are the ultimate exercise for targeting hip stability without ankle contribution!
 It's an extremely challenging exercise, trust me!
Closing Thoughts
Hip stability plays a very important role in how we move. If we do not build a proper foundation from our hips, it can lead to issues not only at the hips but above and below the joint as well. When deciphering how to improve hip stability, be sure to work in all 3 planes, and make a progression towards functional movements!
Bulletproof Your Hips With Prehab!

To go from stepping to sitting we can thank the 27 muscles that cross the hip joint for their work. After thanking them, we should also thank your core, knees, feet, and really the rest of your movement system as they work together on a team to create movement. Perhaps, the best way to thank them is by giving them what they desire: strength and power!
About The Author
Michael Lau, PT, DPT, CSCS
Prehab Co-Founder & Chief Product Officer
 Michael was born and raised in Northern California but now currently resides in Sunny SoCal ever since attending the University of California, Los Angeles as an undergraduate majoring in physiology. After his undergraduate studies, he received his Doctorate in Physical Therapy from cross-town rival the University of Southern California. As a licensed physical therapist with a strong background in strength and conditioning, Michael likes to blend the realms of strength training and rehabilitation to provide prehab, or preventative rehabilitation, to his patients. A common human behavior is to address problems after they become an issue and far often too late, which is a reactionary approach. He believes the key to improved health care is education and awareness. This proactive approach-prehab-can reduce the risk of injuries and pain in the first place. He is a huge proponent of movement education and pain science. Clinically, he has a special interest in ACLR rehab and return to sport for the lower extremity athlete.